Videos add so much value to your website and are popular with visitors! Learn how to add a video to your WordPress website in this easy tutorial!
Posted on July 12, 2019
 Pictures, images, and infographics are all a great way to improve the look of your WordPress website. After all, just looking at a wall of text can be boring and turn away visitors from your website.
Similarly, as your staff or office changes, you may want to update pictures on your website quickly and easily. As part of our ongoing series of WordPress tutorials, we’ll walk you through how to add images, change out existing media, and even use your media to improve your search engine rankings!
Adding a New Image or Picture in WordPress
If you’re adding a new page to your WordPress website, you’ll want to know how to add images. Once you learn how to quickly do this, you can add all kinds of bright, vibrant graphics, photographs, and more to highlight your business, inform your clients, and show off your work in action!
Step One: Optimizing Your Images
Before you start in WordPress, you want to make sure the images, photos, and graphics you add to your site are beneficial. Some large image files can slow down the load speed of your site and cause visitors to leave, while improperly named images can actually harm your business in search engine rankings (Yes, Google and Bing crawl your images, too!).
Image Size
For large images, like banners, home page graphics, and team photographs, you don’t want the size of the image file to go much over 100Kb, while smaller images to highlight a blog post or sub-page are only around 30Kb. The size of the picture itself can vary depending on your needs, and you can always change the size in WordPress itself, but remember that re-sizing a picture to make it larger can ruin the clarity. Most everyday pictures you upload can be in the 600 x 600 pixels to 900 x 900 pixels range and will work for most needs.
Image Name
Make sure you name the image to include your keywords. For example, if you own a jewelry store and you’re posting a picture of a diamond necklace, you’ll want to re-name your image file “Diamond necklace at Raleigh jewelry store.” Similarly, a team photo would be named, “The team at our Raleigh jewelry store.”
Step Two: Log in to WordPress
If you’re familiar with our WordPress tutorials, you’ll know we always start with this step because we love to be thorough!
To login to your website, add in /login to your URL (for example www.yourwebsite.com/login), and you’ll be taken to a page that asks for your username and password. We often setup your username to be the same as your email address for ease of use.
Now, you should be looking at your site’s dashboard and the long menu on the left-hand side once you log in.
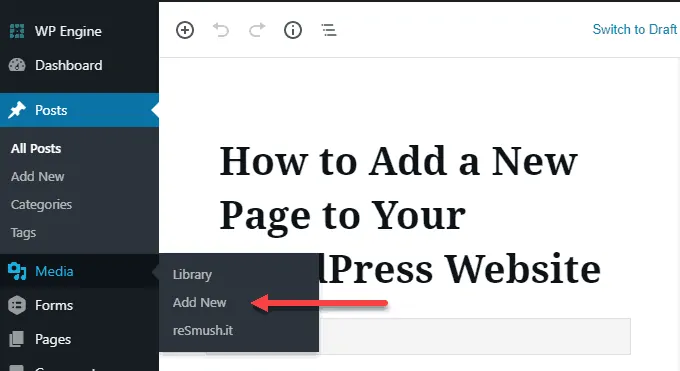
Step Three: Adding Images to Media Library
Whether you’re adding a single image or dozens, you can do it all easily through your Media Library. In your left hand menu, you’ll see the Media option and a menu that includes Library and Add New along. Select Add New.
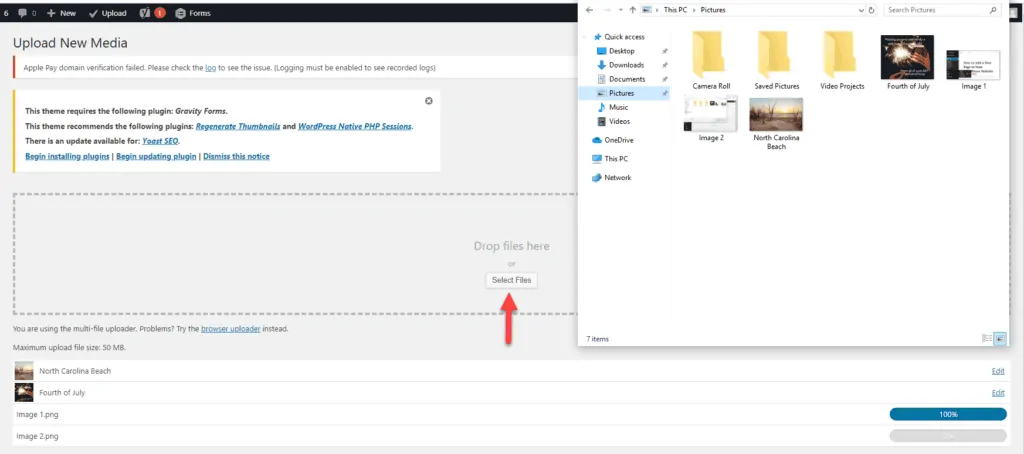
Once there, you can either drop files or click the Select Files button which will open your computer folder. From there, simply select the images you want to add to your website. Once the uploads are complete, you can add them into your website pages and blog posts wherever you prefer.
Note: If you need pictures for your website, you can get high-quality, free stock photography from Pixabay, Unsplash, and Pexels. Or if you need a very specific image, buy it from a trusted stock photography site like Adobe Stock. Don’t just Google search for the image you want and use it – that may get you in hot water with the image’s license holder and could even result in fines in excess of $5,000.
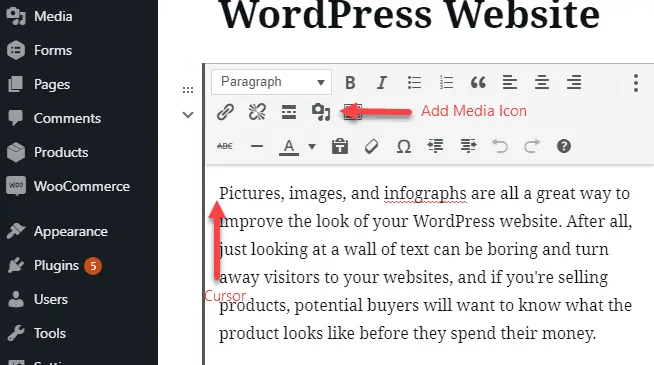
Step Four: Adding an Image to a Page or Post
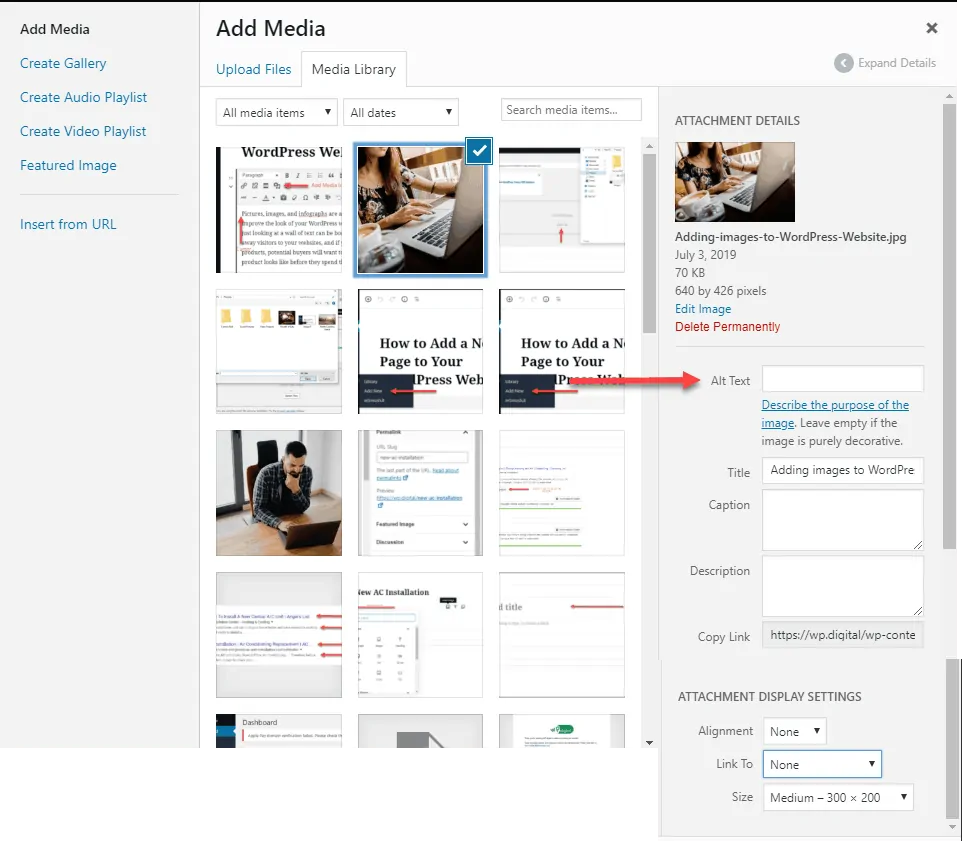
To add a newly uploaded image to a page on your website or a blog post, open the page or post you want to improve, and select the location where you want to add the image (For sub pages and blogs, it’s often easy just to move the cursor to the very beginning of the post). Then, select the Add Media icon, and this will open your media library.
With your media library open, select the image you want to add, and it will be outlined in blue, and give you options to edit it. The first thing you want to do is add “alt text.” Alt text is what is read to a visually impaired person to describe the picture, but it also is read by website crawlers and can have a positive effect on your website’s SEO.
Going back to the diamond necklace image, adding alt text that reads, “Beautiful diamond necklace available at our Raleigh jewelry store” is descriptive and has keyword rich text.
If you scroll down on the right side of the page with the attachment details, you can also change the size of the image, update the alignment, or link the image to another page on your website. You can also make those edits once you’ve already added the image to the page by simply clicking on the image.
After you’ve got the images where you want them, make sure you save the draft or update your published page or post!
Build Your WordPress Website with WP.digital
WordPress websites are easy to update, optimize, and maintain without sacrificing a professional look. WP.digital offers affordable packages that includes our experienced team building your website and ongoing digital marketing services and search engine optimization so you can focus on building your business versus building a website.