
Make it easy for your customers to reach out to you by learning how to add a contact form in your WordPress website!
Posted on June 28, 2019
Having contact forms on your business’s website is one of the easiest ways to generate and increase leads from potential clients. Visitors to your WordPress website can quickly fill out a form from their phone, tablet, or laptop, anytime and anyplace, making it much more convenient than having to wait to call during business hours or leave a voicemail.
However, it’s important that the right person at your office is getting the contact information emailed to them so you don’t lose out on any leads. To help you make the most of your contact forms, we’re providing you a step-by-step guide to change or update who receives notifications for your contact forms.
Step One: Login to WordPress
You probably already know this step, but at WP.digital, we believe in being thorough. First, make sure you are signed into your website’s dashboard.
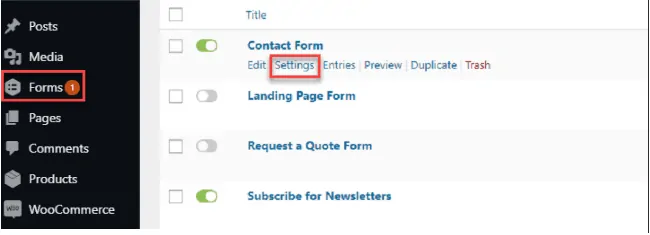
Step Two: Find the Forms in Your Dashboard
On your WordPress user menu on the left side of your screen, you’ll want to select the ‘Forms’ tab. Once you select it, you’ll see your available forms, including your Contact Form. Scroll over your Contact Form, and you’ll see your options pop up. Select ‘settings’ and move on to Step Three!
Step Three: Adjusting Your Settings
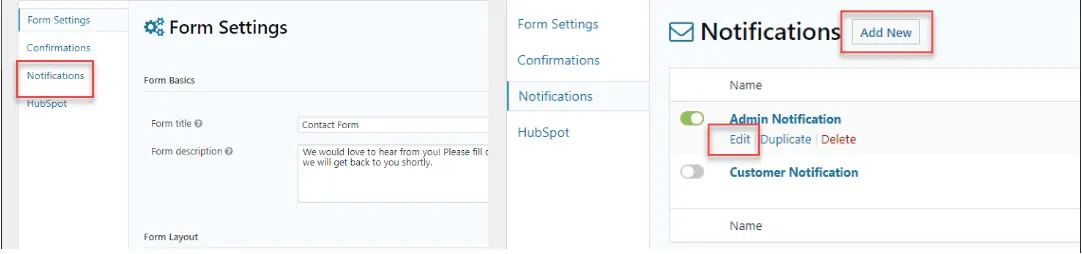
Once you select your settings, you’ll be taken your Form Settings page, but you’ll want to select your ‘notifications’ option on the left-side menu. From there you should see two options, your Admin notification, which forwards the contact form to your email, and your customer notification, which lets the customer know you received their form. Let’s choose ‘admin notification.’
Or, if you haven’t set up an admin at all, you can select ‘add new’ to create a notification so you get your contact forms in the first place!
Step Four: Editing or Setting Up a New Admin
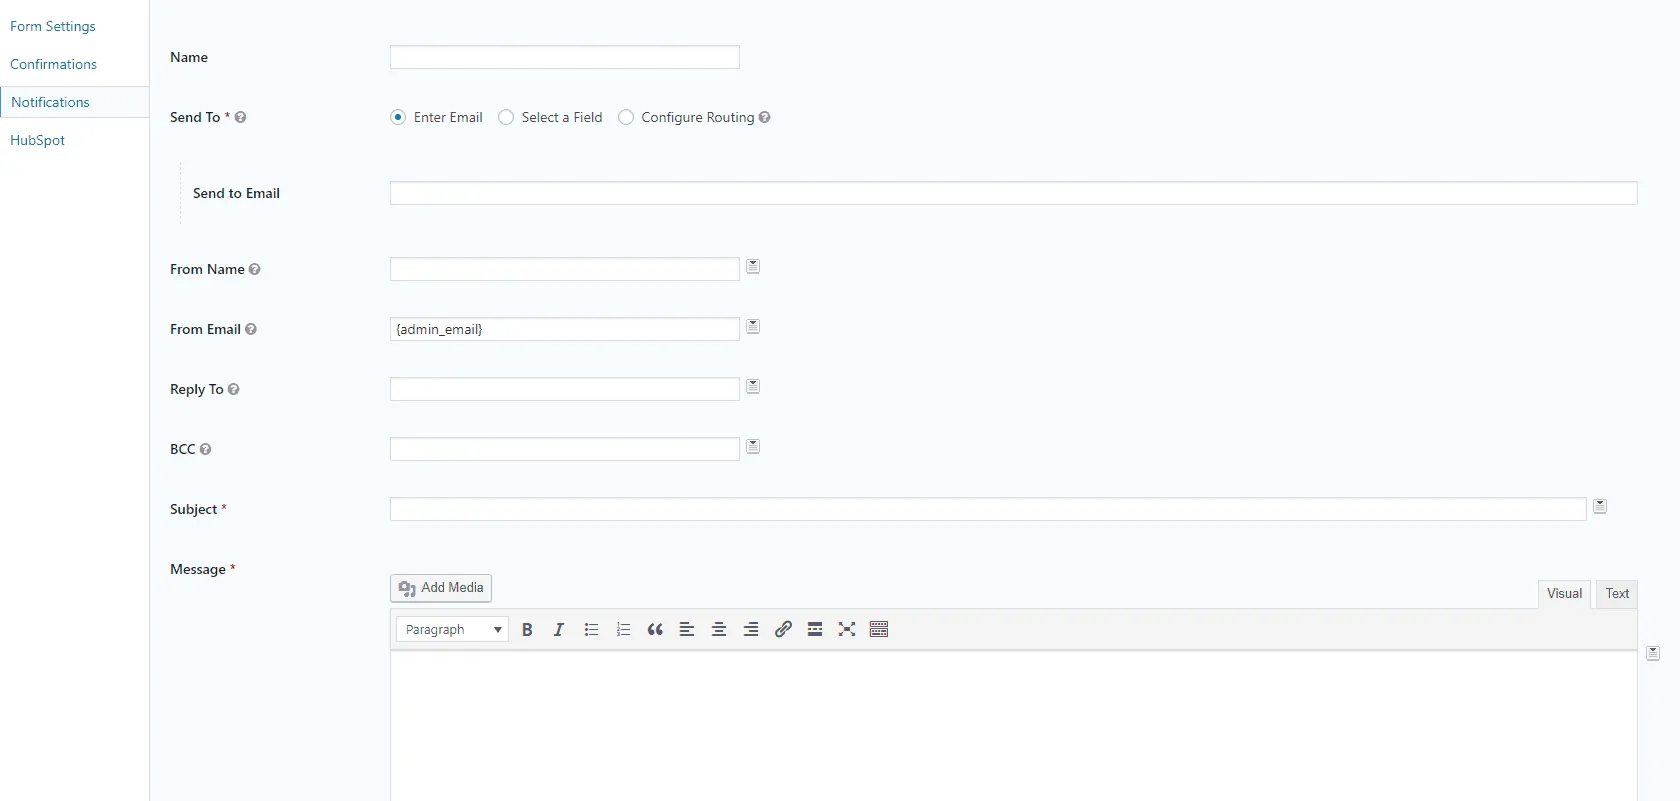
Once you click on the ‘edit’ button, you can update the email and admin information. However, if you’re setting up a new admin entirely, you’ll want to fill out the fields to your preference. First, select the name of your notification. We chose admin notification at WP.digital to keep things easy!
Make sure you choose ‘enter email’ in your ‘send to’ option so your notifications are emailed directly to you. Now, let’s customize your notification line by line:
Enter Email: Put the email address you want any notifications to go to
From Name: This is where we enter the name that displays as the sender of our notification email. This can be dynamically generated using merge tags available in the drop down menu to the right of the “from name” entry box. You’ll see there’s a box for each subsequent entry box for merge tags which allow you to put in.
From Email: This is the field where you enter the email address you want notifications you send to come from. You can choose one email or use an email address with merge tags, though we do recommend sending it to an address different than one listed on your website to avoid spam filters flagging it.
Reply To: Enter the email where you want replies sent.
BCC: “Blind carbon copy” is the field that allows you to add other email address to receive notifications. Just separate each email entry with a comma.
Subject: Enter the subject you want your notification email to have to alert you that you got a contact form submission. Something like “New Contact Form Submission” or something that will catch your interest.
Message: This is the most important part of this whole form – the information you want to receive from your notification. You can add a message to remind the person receiving the email to respond to the contact form within a certain time or you can not worry about adding a message. It’s your preference. The one thing you have to include in that message box is {all_fields} to ensure that you’ll receive all the data from the contact form.
Once you enter in all your data, at the bottom of the form, you’ll see two check boxes, one for auto-formatting and one for conditional logic. Both you can leave blank for now. Next, click Update notification at the bottom, and you’re all done!
Contact Us for Your Web Design Needs!
If you need an easy to use, WordPress website for your business, we can help! We create attractive websites that are easy to use and work for your small business’s budget. As part of our monthly packages, we include on-going marketing and search engine optimization to help you build your business! Contact us today at 888-239-9222 or fill out our contact form to learn more!