Use this step-by-step guide to reset your password and get back into your website in no time!
Posted on June 21, 2019
One of the biggest benefits to having a WordPress website for your small business is that anyone with access can add updates at any time. If you have employees, you can turn some of your website updates over to them, so you can focus on running your business.
First, you have to add them as a user so they have full access to the back end of your site. Not sure how to add a new user? Not a problem! We’ve made a convenient, step-by-step guide to help you out.
Step One: Logging in to WordPress
If you’re not already there, the first step is logging into your website’s dashboard.
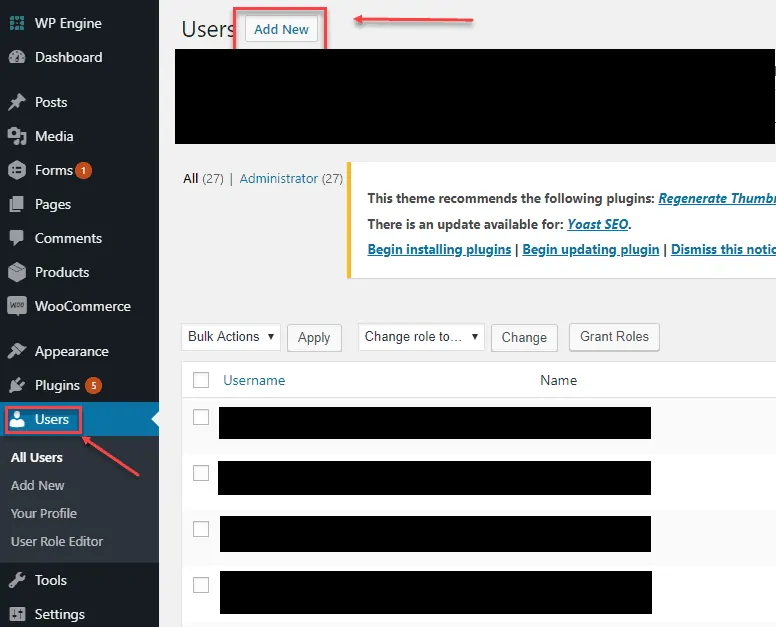
Step Two: Getting to the New User Screen
At the left side of the dashboard, you’ll see your menu. Select ‘Users’ from the list of options – it’s the icon shaped like a person. Once you are on the Users screen, you’ll see at the top there is an option to ‘Add New.’
Step Three: Adding a New User
You should be on the ‘Add New User’ screen, where you can fill in the information for anyone to whom you give website access. You have to assign them a username and add their email address, and you have the option of adding their first and last name and a website.
Next, you’ll want to assign them a password. You can select one for them, or use the WordPress generated password. Once the new user has access, they can change their website to one they prefer. However, it’s important to make sure it’s a secure, difficult-to-hack password, so it should include upper and lowercase letters, numbers, and symbols.

Step Four: Assigning a Role
Your new user will need to be assigned a role that allows them specific access and permission on your website. Your options include:
- Administrator: Full access to the features of the website, including settings, tools, forms, and other administration features.
- Editor: Can publish, edit, and manage all posts and pages, including ones other users have written and published.
- Author: Can write, publish, edit, and manage their own posts and pages.
- Contributor: Can write and manage posts and pages they have written, but can’t publish them to the website.
- Subscriber: Can only manage their profile information (username, email, website, etc)
Choose the role you want them to have in the drop down menu. Then select the ‘Add New User’ button below that, and you’re done!
Contact Us for a WordPress Website
If you would like a modern, attractive website to reflect your growing business, reach out to the design team at WP.digital! We create WordPress websites that offer the features your customers want and an easy-to-use back end that lets you update and make changes whenever you want. As part of our monthly packages, you’ll also receive ongoing marketing and search engine optimization to improve your visibility and help you grow! Contact us today at 888-239-9222 or fill out our contact form to learn more!
Related Posts
Read More